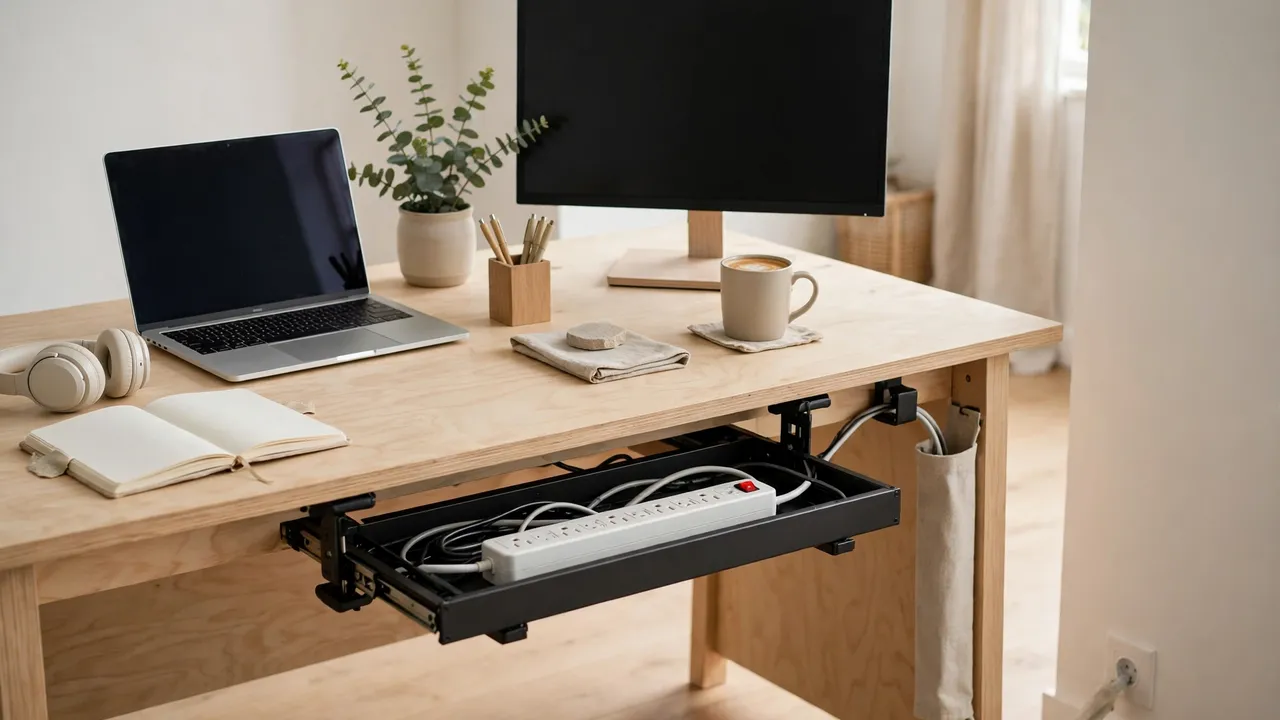
A removable desk cable management setup is a complete under-desk system built from adhesive or clamp-on fixings, a lift-out tray, and labelled, detachable cable runs, so it can be taken down cleanly and put back up somewhere else. Plan the layout first, choose fixings that suit your desk surface, keep the power strip and adapters in a tray you can lift out in one piece, and label every cable at both ends.
Most cable management is built as if the desk will never move: trays screwed in, cables zip-tied into a permanent bundle, the power strip buried out of reach. That works until a tenancy ends or a desk is replaced, when every fixing has to be cut away and bought again.
What Is Removable Desk Cable Management?
A setup counts as removable when nothing is screwed, nailed or drilled into the desk, wall or floor; every fixing can be taken off without damaging the surface, using the maker’s recommended removal method; and the cables can be separated without cutting anything, so they can be reconnected in the same order elsewhere.
Step 1: Plan the Layout
List everything that needs power or a data connection: monitor, laptop charger, printer, speakers and docking station. Count the plugs, not just the devices, and check each cable reaches the tray and the wall socket with a little slack to spare.
Decide where the tray will live: usually under the desk, close to the back edge, hidden from the front but reachable from your chair. Check it will not clash with drawers, a modesty panel or desk legs, and leave a gap behind a desk against a wall so the cable to the socket is not crushed.
Sketch each cable’s route, marking where it leaves the device, enters the tray, and leaves for the wall. Photograph the sketch. Finally, check the surfaces: a smooth, sealed underside suits adhesive, while a rough, unfinished, waxed or flaking surface usually needs a clamp-on fixing. Note the desk-top thickness too, since clamps only fit within a stated range.
Step 2: Gather Materials and Tools
- A removable cable tray or basket: wide enough for your power strip and largest adapters.
- Removable tray fixings: adhesive pads rated for the loaded weight, or a clamp-on tray. Keep spare pads for the rebuild.
- Adhesive cable clips or hooks: to guide cables along the underside.
- Reusable hook-and-loop cable ties: for bundling cables loosely.
- A cable sleeve or split tubing (optional): to bundle a group of cables into one openable run.
- Labels or coloured tape: for marking each cable at both ends.
- A cleaning cloth and suitable cleaner, a tape measure, a pencil, and a small pouch: for preparing surfaces and keeping spares together.
Keep the packaging and instructions for every fixing: weight rating, suitable surfaces, curing time and removal method vary between brands.

Step 3: Choose Removable Fixings
Adhesive pads and strips
Adhesive is the simplest choice for a smooth, sealed underside. It leaves no holes and, removed correctly, no marks. Choose pads with a stated weight rating that comfortably exceeds the loaded tray, including its contents. Use several wide pads and press each one firmly. Leave the tray empty for the curing time on the packet, often several hours, before loading it: loading adhesive before it has cured is a common reason trays fall down overnight. Adhesive does not suit rough, unfinished or flaking surfaces or waxed wood, so test one pad on a hidden spot first.
Clamp-on fixings
Clamp-on trays grip the back edge of the desk, so nothing is stuck to any surface at all. They suit rented desks and surfaces that will not take adhesive. Check the clamp range against your desk-top thickness, and that the clamp does not foul a drawer, modesty panel or cable port. They are the easiest type to remove and reinstall, with no adhesive to replace and no curing time to wait for. The trade-off is fit: a loose clamp will slide, and one forced onto a thicker top may mark the edge or fail to grip.
Hook-and-loop ties, sleeves and magnetic fixings
Hook-and-loop ties are the workhorse of a removable setup. They bundle cables firmly and can be opened and closed many times. Use them wherever cables run together, and to take the weight off adhesive clips. An openable sleeve does a similar job for a whole group of cables. Magnetic holders can also work on steel desk frames, but only where there is a suitable steel surface.
Step 4: Build the Removable Tray System
Mount the tray before you load it, and load it before you route the cables into it. Mark the position with a pencil first, and check the clearance around drawers, legs and moving parts. For adhesive, clean the contact area, let it dry, line the tray up with your marks and press each pad in turn. For a clamp-on tray, fit the clamps, tighten them evenly, and check the tray sits level.
Place the power strip inside the tray with its sockets facing up or outwards and its switch within easy reach. Do not overload the strip, do not plug one strip into another, and do not cover the strip or any adapter that gets warm. Leave air moving around the adapters. Keep the tray as one removable unit, so on moving day you can lift it off the desk, contents still arranged, and set it in a box or bag.
Step 5: Create Labelled, Detachable Cable Runs
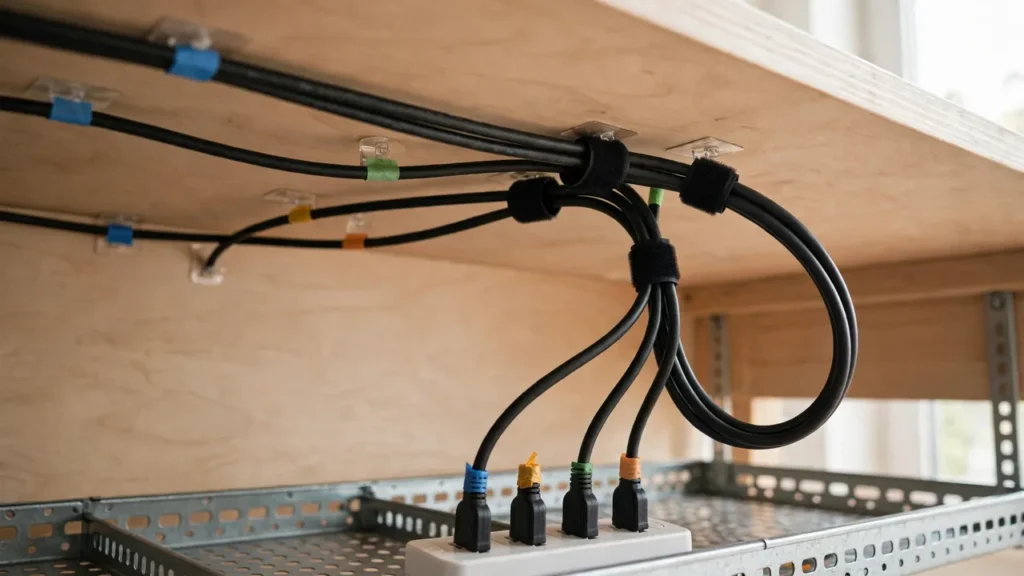
Route each cable in turn: down from the device in a short, tidy drop, along the underside with clips or hooks, and into the tray. Leave a gentle loop of slack at each end, so a monitor can be tilted or a laptop lifted without tugging at its socket. Avoid sharp bends, especially near plugs.
Label every cable at both ends before it disappears into the tray: a small tag or wrap of coloured tape at the device end and at the tray end, using the same colour or word at both ends of the same cable.
Bundle cables that follow the same route with a hook-and-loop tie, loosely enough that any one cable can be pulled out. Route the cable from the power strip to the wall socket last, taking the shortest sensible path with a gentle loop of slack near the socket. It must not cross a walkway, run under a chair leg, or sit where it can be pinched. If the socket is far away, use a longer strip cable or reposition the desk rather than stretching the cable tight.
Step 6: Test, Photograph and Record the Setup
Test the setup as if you were using it: switch each device on, move the monitor, lift the laptop, open drawers, and roll the chair in and out. Nothing should tug, catch or pull, and the power strip switch should be reachable without crawling under the desk.
Then record it: photograph the underside, the tray interior with labels visible, and the wall-socket end. Keep the photos, spare pads and labels together in the pouch from Step 2 — your rebuild kit.
Moving-Day Teardown Checklist
Teardown is the reverse of the build, and should take well under an hour. Switch everything off and unplug from the wall first.
- Unplug the tray feed from the wall socket, then unplug each device cable from its device.
- Label anything not already labelled, including the wall-socket cable.
- Lift the cables out of the clips and sleeves, undoing hook-and-loop ties rather than cutting anything.
- Lift the tray off the desk as one unit, contents still arranged. For adhesive mounts, remove the pads using the maker’s recommended method — usually a slow, low-angle pull — Remove the clips and hooks the same way, without yanking a pad off quickly or using a blade or scraper on a surface you do not own.
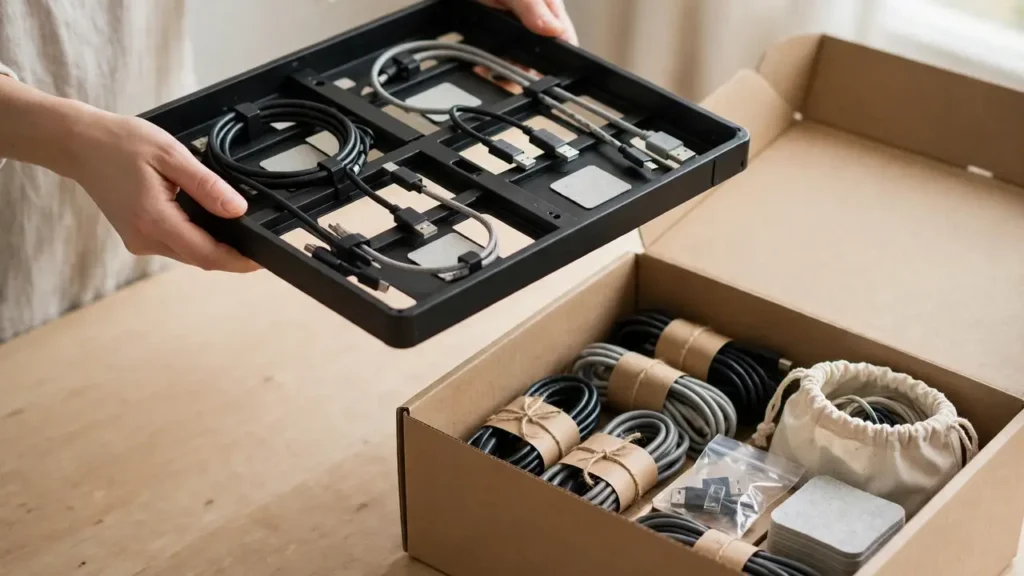
- Pack the tray, cables, clips, spares and rebuild kit together in one box or bag.
Rebuilding at the New Desk
Check the new desk first: surface, thickness, clearance and socket position. A clamp-on tray will usually transfer directly; an adhesive tray will need fresh pads. Mount the empty tray first, wait for any curing time, then reconnect each labelled cable at both ends using the photos as a guide, routing the wall-socket cable last. Test every device. If a cable is now too short, do not stretch it: reposition the desk or replace the cable with a longer one.
Cost-Conscious Alternatives
A simple mesh basket costs less than a branded tray and lifts out just as cleanly. Hook-and-loop ties bought in a roll cost little and can be reused for years, and coloured tape does the job of printed cable tags. Where it is worth spending more is on the fixings: cheap adhesive pads with no stated weight rating are a false economy, so buy pads with a clear rating and replace them at each move.
Common Mistakes to Avoid
- Using single-use cable ties: they have to be cut off at every move.
- Skipping the labels: an unlabelled bundle looks tidy until it has to be reconnected.
- Overloading the tray: an overloaded tray will sag or fall.
- Loading adhesive before it cures: follow the curing time on the packet, even if the tray feels solid.
- Pulling cables tight, or covering warm adapters: tight cables tug at sockets, and a covered adapter cannot shed heat.
- Scattering the spares: they will not be there on moving day.
Troubleshooting
The tray fell down after a move. The usual causes are a dirty surface, loading before the adhesive cured, or reusing old pads. Clean the surface again, use fresh pads, and wait for the full curing time.
Adhesive residue is left on the desk, or a clip will not stick. Try the removal method on the product instructions first, then a cleaner suited to the surface and a soft cloth. Do not use a blade, scourer or harsh solvent on a desk you do not own. If a clip still will not hold, use a clamp-on clip or a hook-and-loop wrap around a desk leg instead.
Cables are too short at the new desk. Do not stretch them or run them across open floor. Move the tray closer to the devices, reposition the desk nearer the socket, or replace the short cable with a longer one.
Frequently Asked Questions
Can I build a removable desk cable management setup in a rented home? Yes — that is the main use for one. Adhesive and clamp-on fixings leave no holes, and removed correctly they should leave no marks. Check your tenancy terms and test adhesive on a hidden spot first.
Is it safe to put a power strip in a tray? Yes, provided the strip is in good condition, not overloaded, not plugged into another strip, and not covered or sealed in a box with no airflow. Keep it accessible and follow the manufacturer’s guidance; for fixed wiring work, ask a qualified electrician.
A removable desk cable management setup is a small investment of planning that pays for itself the first time you move. Build it as a module — tray, fixings, labelled cables and a rebuild kit — and the setup stays the same while the desk, room and sockets change.