
You can hide cables under a desk without drilling by using an adhesive or clamp-on cable tray, adhesive clips and a cable sleeve. Unplug everything, group the cables by device, mount the tray close to the back edge, place the power strip inside it, then guide each cable into the tray with a little slack. The cables disappear from view, stay off the floor, and the desk is left undamaged.
That method works for most wooden, laminate and metal desks, and for many standing desks too. The details matter, though. Adhesive fails on a dusty surface, a tray loaded with heavy adapters will sag, and cables pulled tight will tug at their sockets. This guide covers the fixing, the surface, safe routing, and fixing the problems that cause most trays to fall down.
What You Will Need
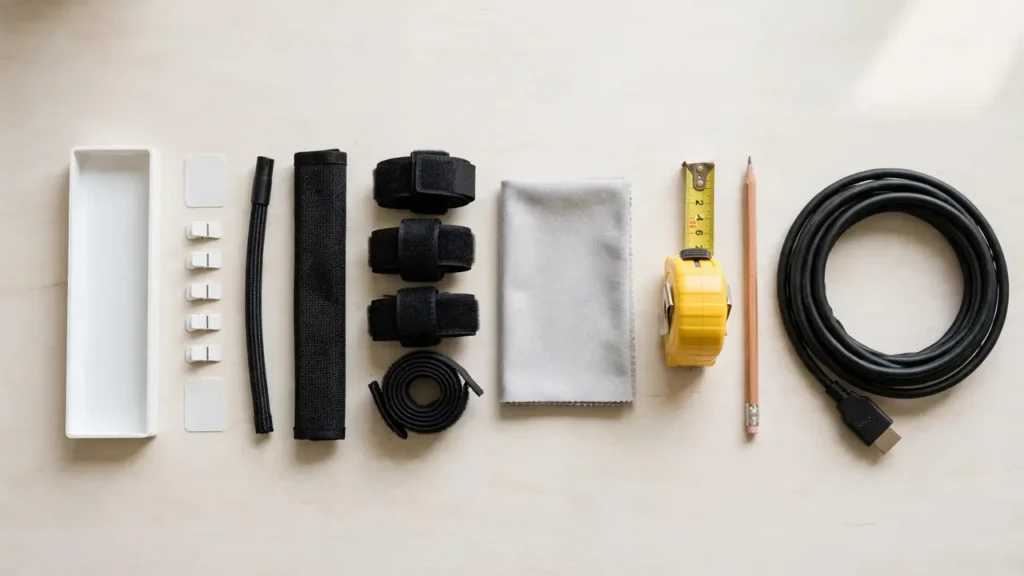
You do not need a drill, screws or specialist tools. Gather the items below, and buy only what suits your desk and the number of cables you have.
- An adhesive or clamp-on cable tray or basket: the main hiding place. Choose one long enough to hold your power strip and the bulkiest adapters.
- Adhesive cable clips: small sticky-backed clips that guide individual cables along the underside.
- A cable sleeve, spiral wrap or split tubing: bundles several cables into one neat run.
- Reusable hook-and-loop cable ties: for bundling cables without cutting anything.
- A cleaning cloth and rubbing alcohol or a suitable cleaner: for preparing the underside so adhesive bonds properly.
- A tape measure and a pencil: for marking the tray position before you stick anything down.
Keep the packaging for any adhesive product you buy. The weight rating, surface guidance and curing time are printed there and vary a lot between brands. A clip made for a thin charging cable will not hold a thick monitor power cable.
Step 1: Unplug, Untangle and Map Your Cables
Switch everything off and unplug every cable from the wall and from each device. Working with live cables under a desk is awkward and unnecessary, and unplugging lets you untangle the whole mess properly.
Lay the cables out and untangle them one at a time. Follow each cable from its plug to its device and note which goes where: monitor, laptop charger, printer, speakers, lamp or phone charger. If several cables look alike, wrap a small piece of coloured tape around each end. Labelling now saves a lot of guessing later.
While the cables are out, check them. Look for frayed insulation, cracked plugs or exposed wires. Damaged cables should be replaced, not hidden. A damaged cable will not get safer inside a tray, and hiding it makes the damage harder to spot. Also check that each cable is long enough to reach from its device to the tray and then to the wall socket, with a little slack to spare.
Decide where the power strip will live. In most no-drill setups it sits inside the cable tray, close to the back edge, with its switch facing outwards so you can reach it. Keep it away from the floor, away from chair legs, and in a place where air can move around it. Never put it in a closed box with no ventilation, or cover an adapter that gets warm.
Step 2: Clean the Underside of the Desk
Adhesive fixings fail far more often because of a dirty surface than because of a weak product. Dust, grease, polish and old sticker residue all stop adhesive pads from bonding. Spend five minutes here and your tray will stay up for months instead of days.
Wipe the area where the tray and clips will go with a dry cloth first to remove loose dust. Then wipe it with a cloth lightly dampened with rubbing alcohol or a cleaner suited to the desk material, and let it dry completely. Do not stick anything to a damp surface.
Check what the underside is made of. A smooth, sealed wooden or laminate top usually takes adhesive well. A rough, unfinished, waxed or heavily textured surface, or one with loose veneer, will not. If it feels powdery, flaky or oily after cleaning, use a clamp-on tray instead.
Mark the tray position with a pencil before you peel any backing off. Hold it close to the back edge, hidden from the front, and check it does not clash with drawers, a modesty panel, desk legs or standing-desk parts.
Step 3: Choose the Right No-Drill Fixing
There are three main ways to hide cables under a desk without drilling, and the best one depends on your desk, your cables and whether you rent your home.
Adhesive cable trays and baskets
Adhesive trays stick to the underside with strong double-sided pads or strips. They are the simplest option for a smooth, clean desk top, and they leave no holes when removed carefully. Look for a tray with several wide adhesive pads rather than two small ones, and check the stated weight limit. A tray holding a power strip and several adapters is much heavier than a tray holding thin data cables alone. Press the pads firmly, and leave the tray empty for the curing time on the packet — often several hours — before loading it.
Clamp-on cable trays
Clamp-on trays grip the back edge of the desk with a clamp or hook, so nothing is stuck or screwed to the surface at all. They suit rented desks, desks with surfaces that will not take adhesive, and anyone who wants to move the tray later. Check the clamp range against the thickness of your desk top, and check that the clamp does not foul a drawer or modesty panel. A clamp-on tray can be just as tidy as an adhesive one, and it is usually easier to remove without a mark.
Adhesive clips, hooks and cable sleeves
For a light setup — a laptop, a monitor and a phone charger, for example — you may not need a tray at all. A row of adhesive clips along the back edge, plus a sleeve to bundle the cables together, can be enough. Clips are cheap, easy to reposition, and ideal for guiding a cable from the tray to a monitor arm or laptop stand. They are not a substitute for a tray when you have a power strip and several bulky adapters, though. Use them to guide and support, not to carry the whole weight.
Step 4: Mount the Tray and Route the Cables
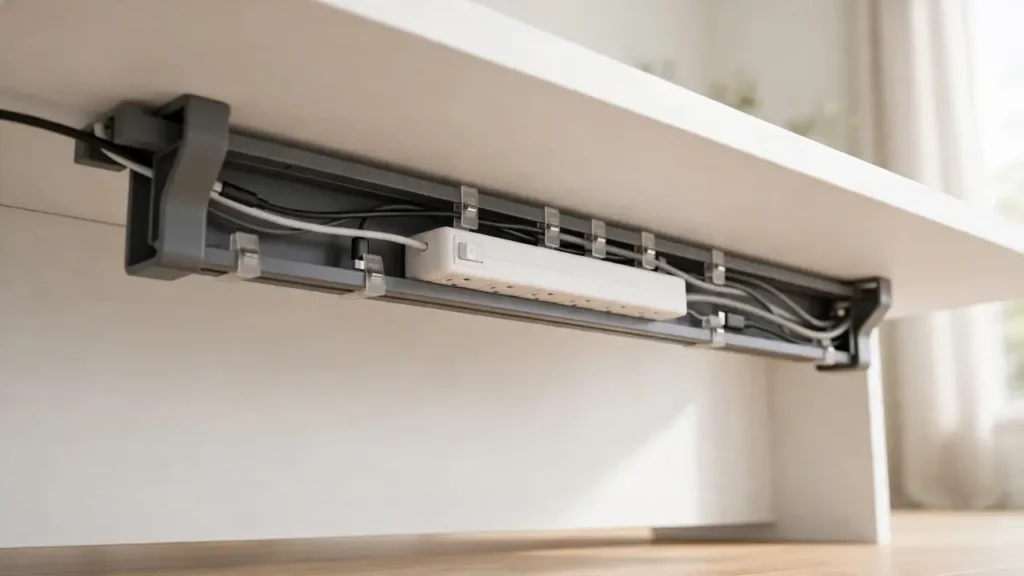
Mount the tray first, then route the cables into it. Do not try to load the tray while you are holding it up. Peel the backing from the adhesive pads, line the tray up with your pencil marks, and press it firmly against the underside for the time the instructions specify. Press each pad in turn rather than pressing the middle of the tray. If the product needs a curing period, wait for it. Loading a tray before the adhesive has set is one of the commonest reasons trays fall down overnight.
Now place the power strip in the tray, with the sockets facing up or outwards and the switch accessible. Run its cable to the wall socket in a way that does not cross a walkway, does not run under a chair leg, and does not get pinched when the desk moves. Leave a gentle loop of slack near the wall socket so the cable is not pulled tight.
Route each device cable into the tray in turn. Bring cables down from the device in a short, tidy drop, then along the underside to the tray using adhesive clips. Avoid sharp bends, especially near plugs, and avoid pulling cables tight across a corner. Where several cables run together, bundle them loosely with a hook-and-loop tie or feed them through a sleeve, leaving enough slack to move a monitor or lift a laptop without tugging.
Step 5: Tidy the Drops and the Desk Surface
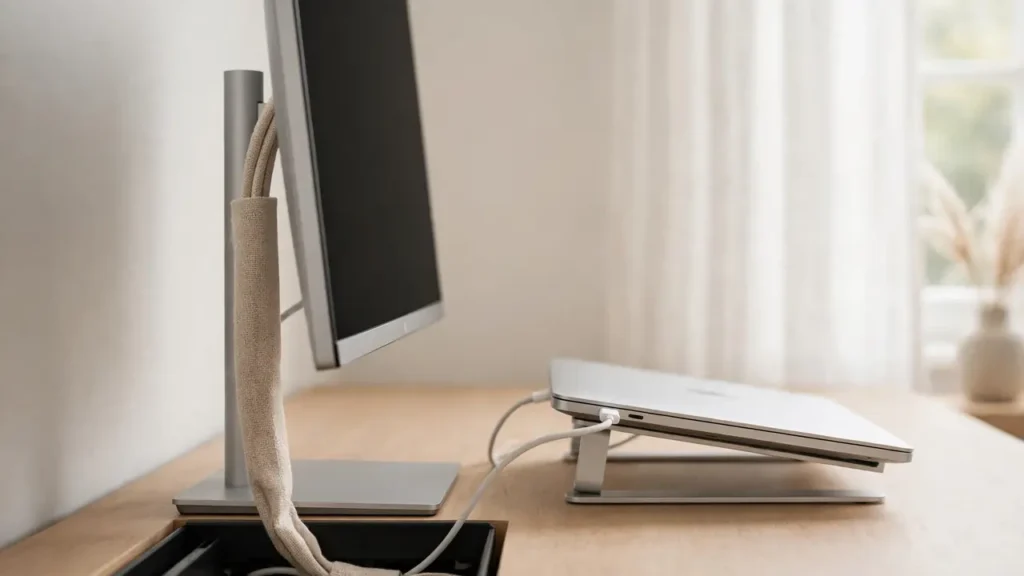
A tray hides the middle of the run, but the drops — the short lengths from the desk surface down to the tray — are what people actually see. Tidy those and the whole setup looks finished. For a monitor, route the cable down the back of the monitor stand or through the monitor arm if it has a cable channel, then straight down into the tray. For a laptop on a stand, bring the charging cable down behind the stand so it is hidden from the front.
Common Mistakes to Avoid
- Skipping the cleaning step: adhesive on a dusty or polished surface will peel away, often in the middle of the night.
- Loading the tray too soon: adhesive needs time to cure. Follow the time on the packet, even if the tray feels solid straight away.
- Overloading the tray: a tray rated for light cables will sag or fall if filled with a power strip and several heavy adapters.
- Pulling cables tight: tight cables tug at sockets, wear at bends and make it hard to move a monitor or laptop.
- Hiding damage: frayed or cracked cables should be replaced, not tucked out of sight.
- Blocking ventilation: do not wrap a power adapter tightly in a sleeve, cover it with fabric, or seal it in a box with no airflow.
- Running cables where they can be crushed: keep cables away from chair legs, desk drawers and standing-desk frames.
Troubleshooting
The tray fell down overnight. The cause is usually a dirty surface, loading before the adhesive cured, or overloading. Clean the surface again, check the weight rating, remove heavy adapters, and remount with fresh pads. If it falls again, switch to a clamp-on tray.
Cables keep slipping out of the clips. The clips may be too large for thin cables, or the cable may be pulling tight. Use smaller clips, add a hook-and-loop tie to take the weight, and add slack.
The power strip switch is hard to reach. Move the tray closer to the side you sit on, or turn the strip so the switch faces outwards. If you cannot reach it comfortably, the tray is in the wrong place.
Frequently Asked Questions
Can I hide cables under a desk without drilling if I rent? Yes. Adhesive and clamp-on fixings are designed for this and leave no holes. Check your tenancy terms, test adhesive on a hidden spot, and keep the removal instructions.
Do I need a tray, or will clips be enough? Clips are enough for two or three light cables. If you have a power strip, several adapters or more than a handful of cables, a tray or basket will look tidier and last longer.
Is it safe to put a power strip under a desk? Yes, provided the strip is in good condition, not overloaded, not daisy-chained to another strip, and not covered or sealed in a box with no airflow. Keep it accessible, keep cables from being crushed, and follow the manufacturer’s guidance. If you need fixed wiring work, ask a qualified electrician.
Hiding cables under a desk without drilling is a small job with a big payoff. Clean the surface, choose a fixing that suits the desk, mount the tray before you load it, and route each cable with a little slack. Check it after a day or two and tighten anything that has slipped.